How to Host an MX Bikes Server – Step-by-Step Guide for Riders
MX Bikes delivers realistic motocross racing with detailed bike physics, challenging tracks, and competitive multiplayer gameplay. Hosting your own server lets you create a dedicated racing environment with your preferred tracks, settings, and multiplayer experience.
This guide walks you through setting up and managing your MX Bikes server with Citadel Servers, and explains why we’re the ideal partner for your hosting needs.
Step 1: Choose a Reliable Hosting Provider
MX Bikes relies on accurate physics, responsive multiplayer, and stable connections to deliver a smooth racing experience. A reliable server host helps keep races running smoothly, especially when multiple riders are competing on the track.
When choosing your provider, focus on:
Performance: Fast CPUs and NVMe SSDs help maintain consistent server performance and responsive gameplay.
Network Quality: Low latency and reliable connectivity are essential for smooth online racing and minimizing connection issues.
Ease of Management: A user-friendly control panel makes it easy to configure your server, manage settings, and handle tracks or mods.
Support Availability: Reliable support helps you quickly resolve server issues and get back on the track.
Citadel Servers provides the performance, reliable networking, and easy-to-use management tools needed to host a smooth MX Bikes multiplayer server.
Step 2: Order Your Hosting Plan
Once you’ve decided to host with Citadel Servers, getting started is simple:
1. Go to the MX Bikes hosting page.
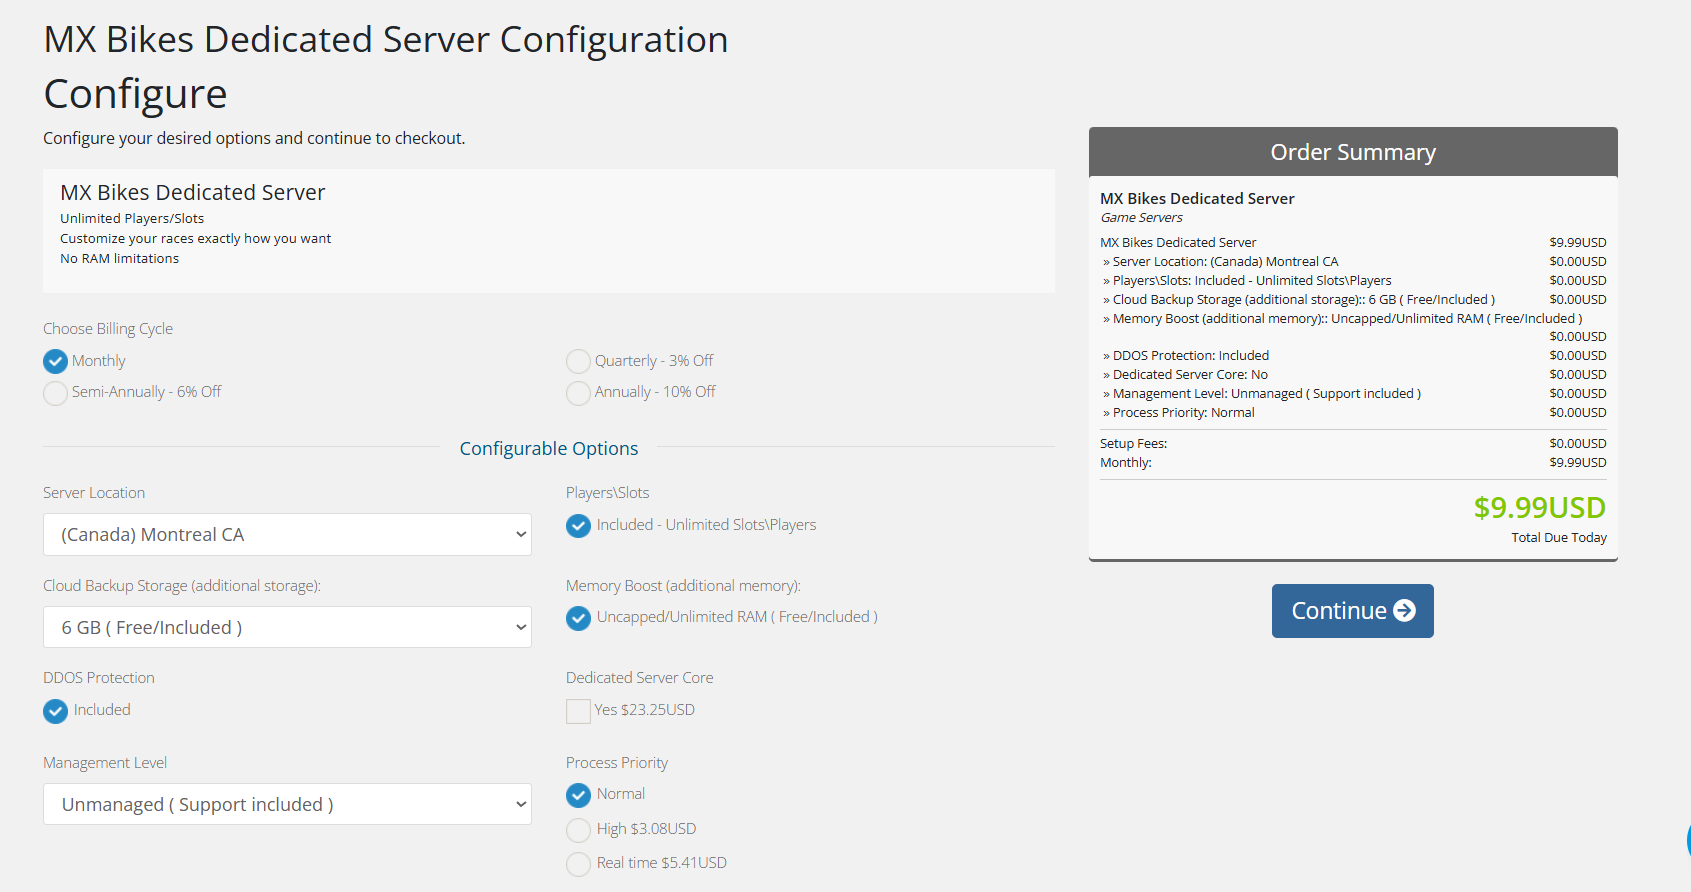
2. Pick your server location closest to your player base for the best ping.
3. Select any extras, like process priority, premium support, etc.
4. Proceed to checkout then once payment is confirmed, your server deploys automatically.
You’ll receive an email with your control panel login details and connection info within minutes.
Step 3: Configure Your Server
After deployment, it’s time to personalize your world:
- Follow our Quick Start Guide
- Set your server name, password, and admin privileges.
- Adjust difficulty, world settings, and AI intensity to fit your gameplay style.
- Enable or install mods using the built-in Mod Manager or upload custom files directly via FTP/SFTP.
All of this can be done directly in the Citadel Control Panel, designed for both new and experienced players.
Step 4: Launch and Play
When your settings are ready, start your server from the panel and invite your friends.
Players can connect via the in-game server browser or by entering the server’s IP and port.
You can monitor activity, manage users, and restart your world at any time all through the same web interface.
Why Host with Citadel Servers
When you host 7 Days to Die with Citadel Servers, you get the power, flexibility, and reliability needed to keep your world alive through every blood moon. Our hosting is built for gamers who want full control and zero interruptions.
What Makes Us Stand Out
Instant Setup: Your server is deployed automatically right after payment, so you can start surviving within minutes.
High-Performance Hardware: All servers run on dedicated CPU resources and ultra-fast NVMe SSD storage for smooth gameplay and minimal lag.
Global Data Centers: Choose from multiple worldwide locations to ensure the best connection for you and your players.
Full Access & Mod Freedom: Enjoy complete file access; upload, edit, and customize every part of your game world.
One-Click Mod Manager: Our built-in modding system lets you browse, install, update, and manage mods instantly without touching complicated tools.
Automated Backups & Easy Restarts: Protect your progress with regular backups and manage reboots directly from your control panel.
24/7 Expert Support: No matter your time zone, our technical team is always available to help you resolve issues quickly and get you back in the game.
Your ride deserves a strong, stable foundation, and that’s exactly what Citadel Servers delivers: performance, control, and reliability designed for serious MX Bikes riders.